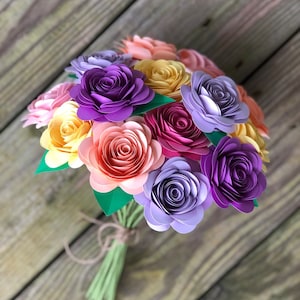
Creating a paper flower bouquet at home is not only a delightful way to spend your time but also a creative outlet that yields stunning, lasting results. Whether you’re crafting for a special occasion or simply want to brighten up your space, paper flowers offer endless possibilities. At 12×12 Cardstock Shop, we’re passionate about providing high-quality materials to help you bring your artistic visions to life. In this blog, we’ll guide you through the process of making a beautiful paper flowers bouquet using our premium cardstock.
Materials Needed
Before we dive into the crafting process, gather the following materials:
– 12×12 Cardstock: Choose a variety of colors and textures to create depth and interest in your bouquet. Our cardstock is ideal for creating sturdy, vibrant flowers.
– Scissors: A good pair of craft scissors will ensure clean cuts.
– Glue or Double-Sided Tape: Essential for assembling your flowers.
– Floral Wire and Tape: These will form the stems of your flowers and help them hold their shape.
– Templates: You can find free templates online or create your own for petals and leaves.
– Optional: Markers, paint, or glitter for added details.
Step-by-Step Instructions
Choose Your Flower Types
Start by deciding which types of flowers you’d like to include in your bouquet. Roses, lilies, and peonies are popular choices but feel free to get creative with different shapes and sizes. Each type of flower will have a unique petal and leaf shape, which you can achieve using templates.
Cut Out the Petals and Leaves
Using your templates, trace the shapes onto your chosen cardstock and carefully cut them out. Remember to vary the sizes and shapes to create a more realistic and interesting bouquet. For added texture, you can curl the edges of the petals using a pencil or your fingers.
Assemble the Flowers
Begin assembling your cardstock flowers by gluing the petals together. Start with the smallest petals and work your way outwards, overlapping them slightly to create a natural look. For flowers like roses, you may want to create a cone shape for the center and then attach the petals around it. Once the flower is complete, add a small circle of cardstock at the base to secure the petals.
Add Stems
Cut a piece of floral wire to your desired stem length and attach it to the base of each flower using floral tape. Wrap the tape tightly around the base and down the wire to create a seamless look. You can also add leaves to the stem using smaller pieces of cardstock.
Arrange Your Bouquet
Once all your flowers are complete, arrange them into a bouquet. Consider varying the height and placement of each flower to mimic the natural look of a fresh bouquet. If you’re feeling extra creative, add additional elements like paper greenery or filler flowers for a fuller arrangement.
Finishing Touches
To finish your bouquet, wrap the stems together with floral tape or ribbon. You can also add a decorative bow for a touch of elegance. If you’re gifting the bouquet, consider placing it in a decorative vase or wrapping it in tissue paper.
Tips for a Stunning Paper Flowers Bouquet
– Experiment with Colors and Textures: Mixing different shades and textures of cardstock can add depth and interest to your bouquet. Consider using metallic or glitter cardstock for a touch of glamour.
– Play with Sizes: Varying the size of your flowers can create a more dynamic and visually appealing arrangement.
– Add Details: Small details like hand-painted edges or glitter accents can make your paper flowers stand out.
Creating a paper flower bouquet is a rewarding and therapeutic craft that allows you to express your creativity. At 12 x 12 Cardstock Shop, we believe in the beauty of handmade creations and are proud to offer the materials you need to craft your stunning bouquet. Whether you’re a seasoned crafter or a beginner, this project is a wonderful way to explore the art of paper flower making. So gather your supplies, put on some relaxing music, and let your creativity bloom!

